Table of Contents
- What is Hydrostatic Testing?
- The Real Objective of Hydrostatic Testing
- Hydrostatic Testing Procedure and Integrity Evaluation
- Quick Guide to Hydrostatic Testing
- Why Does Pressure Drop in My Test If I Don't Detect Visible Leaks?
- The Hidden Risk of Leaving Trapped Air
- How Much Pressure is "Enough" Without Compromising the Structure?
- Hydrostatic Testing and Piping Integrity
- Common Critical Errors
- Leak Tightness Test vs. Mechanical Strength
- "Passed" Tests and Deferred Failures
- Best Practices for a Reliable Hydrostatic Test
- Conclusions
- References
Hydrostatic testing is one of the most widely used methods for validating the integrity and safety of piping systems. However, a seemingly “passed” test does not always guarantee that the system will operate failure-free. Understanding its limits, common errors, and hidden risks ensures piping integrity and prevents problems that might only manifest months after operation begins.
What is Hydrostatic Testing?
The question “what is hydrostatic testing?” appears frequently during design, inspection, and maintenance stages. It is a hydrostatic pressure test that involves filling the system with a fluid—generally water, and pressurizing it to evaluate:
- The mechanical strength of the material.
- Leak testing of welds and fittings.
- The system’s behavior under pressure exceeding its operating pressure.
This method allows for the detection of weaknesses before they compromise operations and is a standard requirement in ASME, API standards, and piping codes.
The Real Objective of Hydrostatic Testing
Although often interpreted as a simple regulatory requirement, the objective of hydrostatic testing goes far beyond “raising pressure and watching.” The primary goal of a well-designed test is to validate piping integrity under a controlled load state, detecting weaknesses that could evolve into catastrophic failures.
Hydrostatic Testing Procedure and Integrity Evaluation
Hydrostatic testing is a fundamental pressure test for confirming piping integrity before commissioning or return to service. Understanding what hydrostatic testing is and how it must be executed allows for the correct interpretation of the pressure test results and avoids erroneous conclusions.
Before the Hydrostatic Test
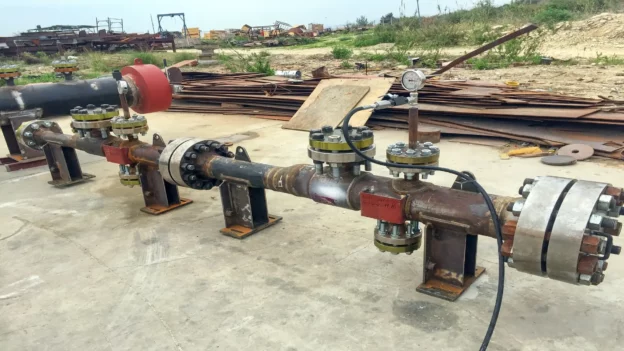
Before initiating the hydrostatic test, the test pressure, stabilization time, and acceptance criteria for the leak tightness test must be clearly defined. The piping must be clean, isolated from the system, and have passed prior visual and quality inspections. Likewise, it is indispensable to verify that the test fluid is compatible with the material and that the instruments used in the pressure test are calibrated and operational. See figure 1.
During the Pressure Test
The hydrostatic pressure test is executed by completely filling the line with the test fluid and removing all trapped air, as this can affect the pressure test reading and compromise the evaluation of piping integrity. The pressure is increased gradually until reaching the hydrostatic test value, where it is held stable while the system’s behavior is monitored and the leak tightness is verified.
After the Hydrostatic Pressure Test
Once the hydrostatic test is concluded, depressurization must be performed in a controlled manner to avoid structural damage. Subsequently, a final inspection is executed to confirm piping integrity, temporary devices are removed, and the results of the hydrostatic pressure test are documented. Any deviation detected in the leak tightness test must be corrected before normal operation.
Quick Guide to Hydrostatic Testing
The following table summarizes how to correctly execute a hydrostatic test, ensuring a reliable pressure test, piping integrity, and a correct leak tightness verification during the hydrostatic pressure assay.
| Hydrostatic Test Stage | What is Verified | Technical Objective |
| Before the test | Cleanliness, isolation, calibrated instruments, and compatible fluid. | Guarantee safe and valid conditions for the pressure test. |
| System Filling | Total elimination of trapped air. | Avoid reading errors in the hydrostatic pressure test. |
| Pressure Application | Gradual increase up to the hydrostatic test pressure. | Evaluate strength without compromising the structure. |
| Stabilization | Constant pressure without drops. | Confirm the leak tightness test. |
| Inspection | Visual review and continuous monitoring. | Validate the integrity of the piping. |
| Depressurization | Controlled release of pressure. | Prevent subsequent damage. |
| Final Evaluation | Recording and analysis of results. | Determine acceptance of the hydrostatic pressure test. |
Why Does Pressure Drop in My Test If I Don’t Detect Visible Leaks?
This is one of the most common questions during a hydrostatic test and one of the most misinterpreted. The main causes of pressure drops without visible leaks include:
Trapped air in the system
The presence of compressible air generates apparent pressure drops during the hydrostatic pressure test, even when no real leaks exist.
Elastic deformation of the material
The expansion of the piping under pressure can momentarily decrease the pressure.
Temperature variations
Small thermal changes in the fluid during the hydrostatic test directly affect internal pressure.
Absorption in non-metallic elements
Gaskets, internal linings, or test hoses can absorb fluid, simulating a loss of pressure. Understanding these variables prevents unjustified rejections or, worse yet, incorrect approvals.
The Hidden Risk of Leaving Trapped Air
Trapped air not only falsifies readings but also represents real risks:
- Sudden release of energy if a failure occurs.
- Non-conservative results in the pressure test.
- Inability to detect real micro-leaks.
From the standpoint of piping integrity, a system with trapped air is not being evaluated correctly. Therefore, good practices demand strategic venting and controlled filling before the hydrostatic pressure test.
How Much Pressure is “Enough” Without Compromising the Structure?
There is no single universal value. The adequate pressure in a hydrostatic test depends on:
- The applicable design code.
- The material and thickness of the piping.
- The metallurgical condition and state of degradation.
Generally, the pressure test is established between 1.25 and 1.5 times the maximum operating pressure. Exceeding these limits without analysis can induce:
- Permanent plastic deformation.
- Cumulative damage due to overstress.
- Reduction of the system’s service life.
Hydrostatic Testing and Piping Integrity
Piping integrity is not guaranteed solely by a leak tightness test. The test must be part of a comprehensive approach that considers:
- Corrosion history.
- Results of visual inspection and NDT (Non-Destructive Testing).
- Actual operating conditions.
Without this context, the hydrostatic test can become merely a bureaucratic formality.
Common Critical Errors
Throughout field experience, patterns repeat that compromise the validity of the hydrostatic pressure test:
- Failure to completely remove air.
- Measurement instruments without calibration.
- Insufficient stabilization times.
- Incorrect interpretation of pressure drops.
According to API RP 1110, a poorly executed hydrostatic test can generate a false sense of integrity. These errors reduce the validity of the pressure test and compromise safety.
Leak Tightness Test vs. Mechanical Strength
A key point is understanding that the leak tightness test is not always equivalent to structural strength. A system may present no leaks and yet have:
- Critical remaining thicknesses.
- Active sub-critical defects.
- Damage due to corrosion or fatigue.
Therefore, the hydrostatic test must be interpreted within a comprehensive integrity plan.
“Passed” Tests and Deferred Failures
Key Technical Note: In practice, many “passed” hydrostatic tests hide failures that only manifest months later, when the system is already in operation. These deferred failures are usually associated with:
- Weakened zones that pass the test by a minimum margin.
- Micro-cracks not detectable during the pressure test.
- Operating conditions that are more severe than those of the test.
Best Practices for a Reliable Hydrostatic Test
For the test to be effective, the following is recommended:
- Risk-based planning.
- Effective elimination of trapped air.
- Thermal control of the test fluid.
- Calibrated and redundant instrumentation.
- Technical analysis subsequent to the hydrostatic pressure test.
This practice ensures piping integrity and reduces the probability of unexpected failures.
Conclusions
Hydrostatic testing remains an essential tool for evaluating the safety of pressurized systems. Its effectiveness depends on correct planning, execution, and interpretation. Understanding why pressure drops, the risks of trapped air, and pressurization limits transforms the pressure test into a true mechanism for piping integrity assurance, rather than a simple documentary requirement.
References
- American Society of Mechanical Engineers. (2022). ASME B31.3: Process piping. ASME.
- American Petroleum Institute. (2016). API Recommended Practice 570: Piping inspection code: In-service inspection, rating, repair, and alteration of piping systems.
- International Organization for Standardization. (2017). ISO 15649: Petroleum and natural gas industries.
- American Petroleum Institute. (2014). API Recommended Practice 1110: Pressure testing of steel pipelines for the transportation of gas, petroleum gas, hazardous liquids, and carbon dioxide.