Introduction
The AE is defined as: “phenomenon in which transient elastic waves are generated, through the rapid release of energy from sources due to: plastic deformation, crack propagation, erosion, corrosion, impact or localized leaks in a material when it is subjected to certain level of effort” [1]. Once the wave has been generated, it spreads superficially and the interaction of these waves with the surface area causes movement. The acoustic sensors installed on this surface detect this microscopic movement and convert the elastic wave into an electrical signal, which can be processed and analyzed.
This technique has shown high efficiency in structural integrity assessment studies, detecting leaks and defects: in tanks, pressure vessels, pipes, bridges, etc. Research on the AE theory began to be carried out in the middle of the 20th century; however, at present its application has not yet been developed in a wide variety of assets in the industrial sector; Despite the effectiveness of this test method having been proven in some applications in the detection of: faults and/or leaks in pressure vessels, piping systems, storage tanks, welding control, detection of corrosion processes, inspection of structures or machinery.
The wave energy radiates through the material in the form of elastic waves and is captured by sensitive sensors. The monitoring of these waves allows faults in the internal surface of the material to be detected in time and in this way; predict a maintenance that guarantees the conservation of both static and dynamic industrial assets.
This article provides a brief description of the history of the beginnings of the Acoustic Emission Theory, description of the equipment and its operation, advantages and disadvantages, and its application in the oil industry.
History of Acoustic Emission [2]
In the year 6500 BC Ceramic manufacturers were the first to make use of Acoustic Emission (AE) energy. Potters of that time evaluated the stability of ceramic vessels by listening to a sound emitted during the cooling of these vessels in order to assess the quality of ceramic products.
The first document that records observations of AE in metals was made in the 8th century by the Arab alchemist Geber (721-815 AD), where he documents the sounds emitted by tin (“the cry of tin”) and in the forging of tin. iron. In the publication he indicates that tin emits a loud noise when it is deformed and iron also emits sounds when it cools down after being forged.
The first material failure tests carried out with AE are shown below:
· In 1948 Mason, using piezoelectric sensors, demonstrated that the “scream of tin” was produced by an abrupt reorientation of the atomic planes of the crystals.
· In 1950 J. Kaiser, showed that acoustic emission could be detected in metals, including aluminum, copper, lead, steel and zinc subjected to tensile stress. Using piezoelectric detectors, an amplifier and an oscilloscope; was able to prove that the emission occurred in the form of random pulses of short duration and amplitude up to 4 orders of magnitude below that observed in tin noise.
He noted that the acoustic emission was irreversible; that is, it does not occur when a material is reloaded, until the level of demand does not exceed the maximum level reached in the previous test. This irreversible phenomenon is known as the “Kaiser effect”.
· In 1966 in the United States, the first application of acoustic emission as a Non-Destructive Testing technique was carried out. It dealt with the control of the growth of the defects during the hydrostatic test of the chambers of the Polaris missiles, trying, at the same time, to predict the moment of failure before its destruction. In these tests, the multi-sensor triangulation method was used for the first time and the areas of fragility could be precisely located.
Acoustic Emission Principle
The principle of acoustic emission is presented below:
In figure 1a, an initial failure in the form of a crack is shown on the surface of a pipe subjected to a tensile stress. If the fault continues to develop over the surface area as a microcrack, acoustic emission signals will reveal its existence during its growth (figure 1b). This is one of the main advantages of the “Real Time Monitoring” acoustic emission technique.
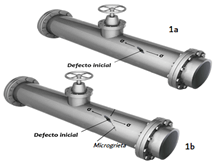
Figure 1. Body under stress developing a defect (microcrack) (FP).
A source of Acoustic Emission (microcrack) generates elastic waves expanding on the surface of the pipe, the waves begin to be transmitted superficially and through this AE phenomenon; remote defect detection is possible through the use of piezoelectric ceramic sensors (Figure 2).
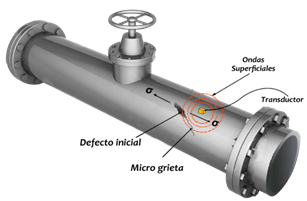
Figure 2. Propagation of acoustic emission waves (FP).
The detection of acoustic emission signals is carried out through the use of transducers: which, as already mentioned, are placed on the surface of the material to be inspected. This type of transducers consist of piezoelectric ceramic materials whose function is to detect the movement of elastic waves (acoustic emission) and convert this type of signal into electrical voltage. Afterwards, the signal (in the form of voltage) is amplified with the help of a preamplifier, thus ensuring that the signal has sufficient intensity to reach the signal acquisition and analysis equipment by means of a computer [3].
A signal analysis kit usually consists of a computer and software that facilitates the analysis of the characteristics of AE signals. Figure 3 shows schematically the shape of a typical acoustic emission signal with its main characteristics [3]. By analyzing the acoustic emission signals, it is possible to assess the structural integrity of the material and in many cases it is possible to determine the location of defects. The main characteristics of the acoustic emission signals are: Duration, Time to maximum amplitude, Amplitude, Energy, and Counts.
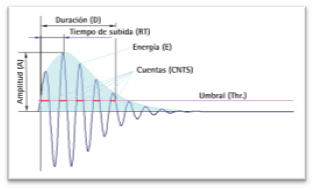
Figure 3. Acoustic detection processing [3].
Acoustic Emission Test (EA)
The basic elements involved in an AE trial can be seen in figure 4. When a material (structure, component or specimen) is subjected to a stimulus; which can be of a different nature (mechanical, electromagnetic, thermal, chemical, etc.), a stress state is induced in the material that can locally modify its internal structure. These increasing discontinuities are called AE sources and the mechanism that generates them is called an event.
After an Acoustic Emission event has occurred, part of the elastic energy stored in the stress field is released in the form of acoustic emission waves. These propagate from the source in all directions and when they reach the surface of the material, they induce small displacements on the surface, being captured by a suitable transducer. Surface movements of the order of 10-12 µm can be detected with appropriate AE sensors strongly coupled to these surfaces. The sensors have the function of converting these displacements into electrical signals.
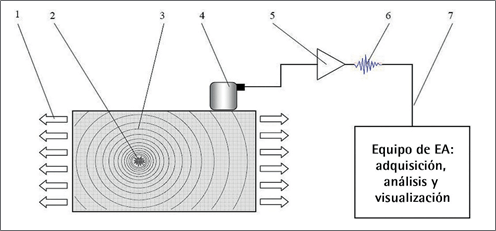
Figure 4. Scheme of the elements involved in an AE trial: 1. encouragement, 2. Increasing discontinuity (Source EA), 3. AE Waves, 4. Sensor, 5. Pre-Amplifier, 6. AE signal, 7. AE Equipment [4].
These signals are weak, which requires pre-amplifiers to minimize noise, interference and avoid signal loss in the cable. The conditioned signal is sent to the AE equipment, which allows the filtering, recording, analysis and visualization of the signals, for the interpretation of the results [4].
Acoustic Emission Equipment
Typical Acoustic Emissions systems consist of the following components:
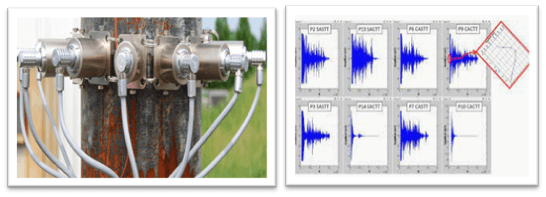
- Sensors that are used to detect acoustic events, typically piezoelectric and have recently been made of optical fibers (Figure 5).
- Preamplifiers to amplify the initial signal.
- Coaxial cables to transfer the signals.
- Data acquisition device, which performs filtering, evaluation of signal parameters, data analysis and graphics (Figure 6).
Acoustic Emission Applications
AE is used in a wide variety of fields, from research to civil and industrial applications. Some of the most widespread applications of this method are summarized below:
- Petrochemical, Oil and Gas Industries to evaluate assets such as storage tanks, distillers, spheres, reactors, offshore platforms, drilling pipes, valves, pressure vessels, etc. (Figure 7).
- Monitoring of welding processes.
- Materials research (eg studies of material properties, decomposition mechanisms and damage behavior).
- Real-time leak detection on items such as small valves, steam lines, and tank bottoms).
- Seismic movements, crack, mines, geothermal applications.
- Electrical Industries for the detection of partial discharges in transformers.

Comparison of AE vs other methods
| ACOUSTIC EMISSION | OTHER TRIALS |
| Identifies the evolution of defects. | Identifies the geometric shape of the defects. |
| Requires the application of a load. | Does not require charges. |
| Each load is unique | The inspection can be repeated. |
| It is sensitive to the type of material. | Less sensitive to the type of material. |
| It is less sensitive to geometry | More sensitive to geometry. |
| It is less invasive compared to the other NDTs | More invasive. |
| Requires only access to sensors. | They require full access to the area to be evaluated. |
| The entire structure is evaluated at once. | It is possible to assess only local areas |
References
[1]. Standard Terminology for Nondestructive Examination. E1316-99a. American Society of Testing and Materials.
[3]. Lenain Jean-Claude, “General Principles of Acoustic Emission”, Dunegan/Endevco. Paris, France.
[4]. Technical report “acoustic emission as an END method. definition, advantages and limitations”, Eva Martínez, Antolino Gallego.

